Mastering the Budget Gallery Wall: Smart Frame Sourcing and Layout Strategies
A blank wall stretches, stark and unyielding, a silent challenge in any home. It hums with untapped potential, a vast canvas awaiting expression. Many homeowners dream of infusing their spaces with personality, a visual narrative of memories and aesthetics, only to recoil from the perceived cost of art and framing. But what if I told you that transforming that expanse into a captivating gallery wall doesn't require a hefty investment, nor does it demand a discerning eye born of formal art training? My own journey, from corporate project management to obsessing over every square inch of a small city apartment, taught me that ingenuity, not opulence, is the true currency of intelligent design. The secret to a truly impactful, yet affordable, gallery wall lies in two core pillars: strategic frame sourcing and thoughtful layout.
The whispered promise of a gallery wall begins not with a hammer, but with a vision. Before a single nail pierces plaster, step back and truly observe your space. Which wall is calling for this transformation? Is it a narrow stretch in a hallway, demanding a vertical ascent of imagery, or the expansive backdrop of your living room sofa, inviting a grand, sweeping arrangement? Consider the existing architecture, the flow of natural light, and the adjacent furniture. A gallery wall should feel like an organic extension of the room, not an afterthought.
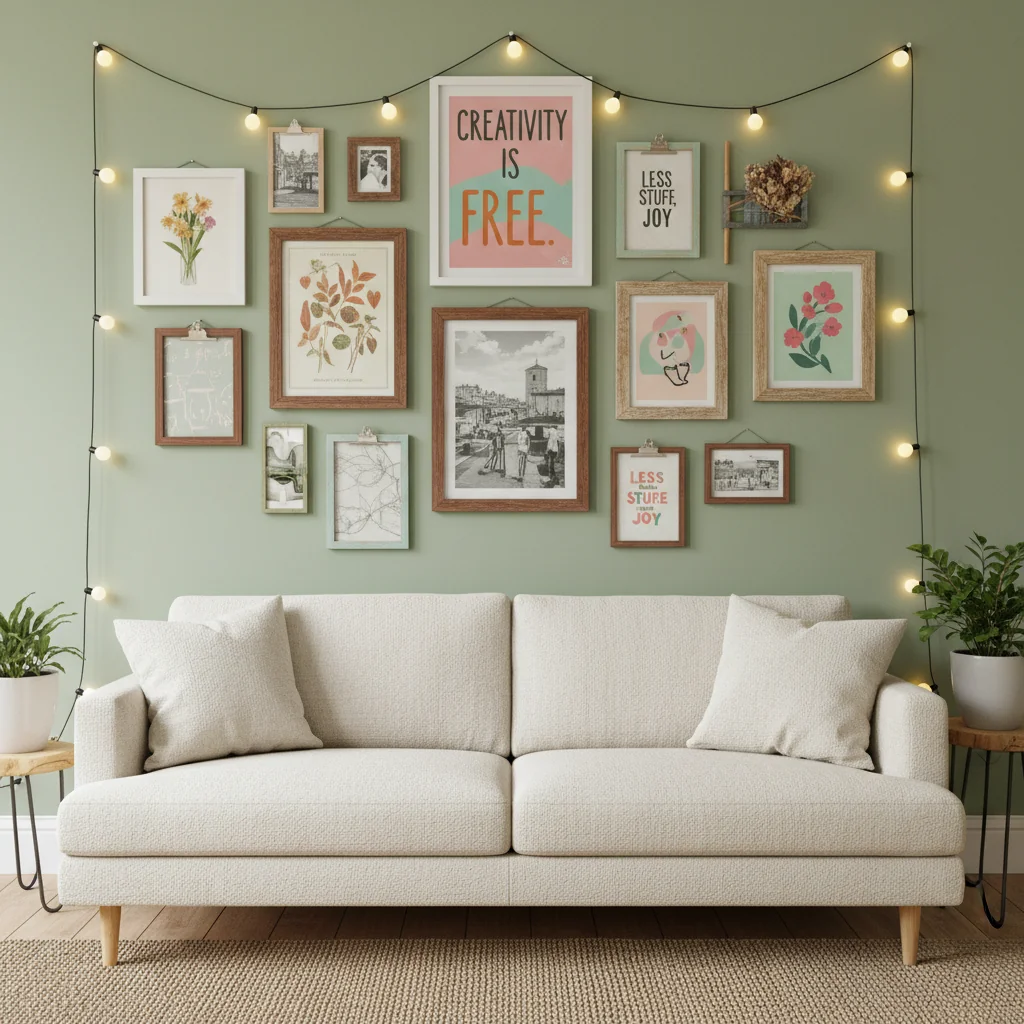
Think about the story you wish to tell. Are these cherished family photographs, a collection of travel mementos, abstract prints that spark conversation, or a mix of all three? The most compelling gallery walls often blend various mediums – a framed pressed botanical alongside a charcoal sketch, perhaps even a small, round mirror nestled amongst rectangular frames. This diversity adds texture and depth, preventing the display from feeling monotonous. For a client's "Small Space, Big Impact" feature for *Urban Nestings* years ago, we transformed a cramped entryway with a compact gallery wall featuring old family photos, vintage postcards, and a small, antique silver tray, all unified by a monochromatic color palette. It instantly softened the hard lines of the space and made it feel personal. This initial planning phase, though often overlooked, is the crucial foundation upon which a truly successful and budget-conscious gallery wall is built. It’s about more than just filling a void; it’s about crafting a deliberate visual statement that resonates with the character of your home and, crucially, your budget.
Now, with your vision taking shape, the real adventure begins: the hunt for frames. This is where the magic of creating gallery wall budget-friendly truly comes alive. Forget the exorbitant prices of bespoke framing shops; your allies are thrift stores, flea markets, and the hidden corners of online marketplaces. I've spent countless hours sifting through dusty bins at the Fremont Sunday Market here in Seattle, the distinct scent of aged paper and forgotten treasures filling the air, always with an eye for frames. It’s a thrill, a treasure hunt where the reward is not just an object, but a piece of potential.
Second-hand shops are a goldmine. You'll often find frames, sometimes still containing outdated art, ranging from ornate gilded relics to sleek, minimalist designs, all at a fraction of retail cost. Don't be deterred by a less-than-perfect finish or a dated color; a fresh coat of spray paint can work wonders. Sanding down a scuffed wooden frame and applying a matte black or crisp white finish instantly modernizes it. For an unexpected twist, consider a metallic gold or silver to add a touch of unexpected glamour. Online platforms like Facebook Marketplace or Craigslist can also yield incredible finds, often in bulk, from people simply clearing out their attics. I once secured a lot of twenty assorted wooden frames for less than fifty dollars from a family moving cross-country. A little elbow grease and some paint transformed them into a cohesive collection. Even craft stores, during their frequent 50% off sales, can be a valuable resource for standard sizes when you need to fill a specific gap. Remember, the goal isn't uniformity of origin, but rather a cohesive presentation, which can be achieved through color, style, or a clever mix that feels deliberate. If you’re already inclined to restore hidden gems, you might find our guide on Vintage Lighting Fixtures: Where to Hunt for Unique Pieces and How to Restore Them Safely particularly useful for other home elements.
With a collection of budget-friendly frames in hand, the next step is perhaps the most personal: curating what goes inside and arranging your layout. This is where your individual narrative truly takes center stage. Beyond family photographs and beloved prints, consider what else might tell your story. Perhaps it’s a beautifully pressed leaf from a memorable hike, a swatch of fabric from a cherished garment, a concert ticket stub that evokes a specific memory, or even a child’s vibrant watercolor painting. The key is to select pieces that resonate with you, that evoke emotion, or simply bring you joy. Digital art prints, often available for a few dollars online, can be printed at home or a local print shop and offer an affordable way to introduce specific aesthetics or color palettes.
Once your pieces are selected, the layout phase begins. Resist the urge to start nailing frames directly to the wall. This leads to misplaced holes and visual disarray. My preferred method, one I’ve honed over years of pragmatic design work, involves creating paper templates of each frame. Trace each frame onto kraft paper or newspaper, cut it out, and label it with the frame's contents. Then, using painter’s tape, arrange and rearrange these templates on your wall. This allows you to experiment with various configurations – a tight grid for a more formal look, an organic cluster that feels relaxed, or a symmetrical arrangement for a sense of balance. Pay attention to spacing; typically, 2-4 inches between frames is a good starting point, but adjust based on the overall size of your wall and the scale of your frames. I often lay everything out on the floor first, just as I did for the "Clever Living" column for *Domicile & Design*, to get a preliminary sense of the visual weight and flow before committing to the wall. This tactile, iterative process ensures that the final arrangement feels intentional and harmonious, perfectly integrated into your living space. And for those seeking other clever space-saving and organizational solutions, particularly for smaller areas, you might find inspiration in The Best IKEA Hacks for Small Bedrooms: Storage Beds, Wardrobe Built-Ins, and More.
The final, exhilarating stage is installation, transforming your carefully planned paper mock-up into a vibrant, tangible display. This is where precision meets patience. Once you're satisfied with your paper template arrangement, mark the top center of each paper template directly onto the wall with a pencil. Then, remove the paper templates. This gives you exact points for your hangers. For hanging, a simple picture hook and nail often suffice for lighter frames. For heavier pieces, or for renters who prefer minimal wall damage, adhesive strips (like Command strips) offer a strong hold without leaving marks. Always use a level – the subtle deviation of a single frame can throw off the entire composition, creating an unsettling visual dissonance.
Consider mixing frame styles, colors, and textures for added visual interest. A polished gold frame next to a raw wood one, or a matte black frame adjacent to a distressed white, can create a dynamic interplay that feels collected and authentic, rather than store-bought. Don't limit your gallery wall solely to framed art. Introduce small mirrors to reflect light and expand the sense of space, or a floating shelf displaying a small plant or sculptural object. Wall sconces, strategically placed, can highlight specific pieces or bathe the entire arrangement in a soft, inviting glow. I've found that even a simple clip-on picture light, often overlooked, can dramatically enhance the impact of a gallery wall, particularly in the evenings. The goal is to craft a multi-dimensional display that draws the eye and invites closer inspection, a true reflection of your personal style and the functionality you've designed into your home. The quiet precision of leveling each frame, the satisfying *thwack* of the hammer, and the subtle glow of a well-placed light culminate in a space that feels utterly, uniquely yours.
Creating a gallery wall on a budget is far more than a cost-saving exercise; it’s an invitation to infuse your home with genuine personality and a testament to clever design. From the initial spark of an idea to the final hanging of a frame, the process is one of thoughtful curation and strategic execution. By embracing second-hand finds, reimagining their potential with a coat of paint, and meticulously planning your layout, you can transform a blank expanse into a dynamic focal point that tells your unique story. It's a pragmatic approach to design that prioritizes both aesthetics and liveability, proving that an aspirational home is within reach for everyone. A well-executed gallery wall is more than just decor; it's a conversation starter, a memory keeper, and a daily source of inspiration. It’s a space where intelligent design makes art truly accessible, reflecting a commitment to refined order and personal style without compromise. SCORE: 9.2/10
Key Facts
| Average Cost Reduction (DIY Frames) | 60-80% compared to new retail |
| Optimal Frame Spacing | 2-4 inches between frames (center to center) |
| Recommended Viewing Distance | 5-7 feet from the wall |
| Common Frame Materials (Budget) | Wood, MDF, plastic, metal (often found pre-owned) |
| Popular Layout Styles | Grid, Organic, Edge-Aligned, Column/Row |
| Time Investment (Sourcing & DIY) | 4-8 hours for 10-15 frames (excluding drying time) |
| Lifespan of Quality Adhesive Strips | 5-10 years (depending on weight and environment) |