From Drab to Fab: My Weekend Project Revamping a Thrift Store Mirror
A cool, almost imperceptible whisper of air stirred the heavy velvet curtains as I stepped into the dimly lit recesses of "Antiques & Oddities." The scent of aged wood, faint dust, and forgotten tales hung in the air, a familiar comfort. This particular Saturday, the thrill of the hunt was palpable; I was on a mission for a specific, yet undefined, piece that could anchor a barren wall in my entryway. My gaze drifted past stacks of forgotten books and chipped porcelain, until it landed. Tucked away, almost an afterthought, leaned a mirror. Its frame, once perhaps grand, was now a dulled, scratched gold, the glass speckled with the dust of decades. But beneath the wear, I saw not just a reflection, but potential. A challenge. An opportunity to prove that true style isn't purchased, but rather, meticulously crafted.
The Allure of the Imperfect: Discovering Potential Amidst the Dust
There is a particular kind of magic that settles upon you the moment you step into an antique shop or a sprawling thrift store. It's not just the quiet hum of history, or the sheer volume of objects clamoring for attention; it’s the whisper of stories from lives long past. For me, these spaces are less about acquiring objects and more about a treasure hunt for forgotten beauty. My eyes, trained over years of scouting for *Urban Nestings* and later *Domicile & Design*, instinctively cut through the visual noise, searching for the underlying structure, the inherent quality beneath the grime.This particular Saturday, the air was thick with the scent of aged paper and beeswax polish, a comforting balm to my senses. My fingers traced the cold, smooth surface of a porcelain vase before moving on. I sought something with presence, a piece that could command a space, yet humble enough to welcome a new life. And then I saw it. Leaning precariously against a stack of tarnished silver trays, half-obscured by a dusty tapestry, was the mirror. Its frame was ornate, with delicate gesso work that hinted at a rococo past, now chipped in places, the original gilded finish flaking like dried skin. The glass itself bore a hazy film, rendering reflections indistinct, ghost-like. My initial reaction was a gentle pull, an instinct honed by years of project management: *assess the damage, identify the core problem, envision the solution*.
I ran a gloved hand along its frame, feeling the rough patches, the smooth curves, the surprising weight. It wasn't perfect, far from it. It was, in fact, gloriously imperfect. But in that imperfection lay its charm, and more importantly, its potential. This wasn't merely a mirror; it was a canvas waiting for its second act. I thought back to an early challenge I’d faced while consulting for a small boutique in Seattle's Ballard neighborhood. The owner wanted a grand, historic feel but had a shoestring budget. We’d sourced several architectural salvage pieces, including a fireplace mantel, transforming them with paint and clever distressing techniques. That experience solidified my belief that a piece's true value isn't its price tag, but its capacity for transformation. This mirror felt like a similar opportunity, a chance to take something overlooked and imbue it with contemporary elegance while respecting its past. The price, a modest fifty dollars, felt less like an exchange for an object and more like an investment in a creative endeavor.
The Pragmatic Approach: Cleaning, Repairing, and Prepping the Canvas
With the mirror carefully loaded into my car, the real work began. Back in my garage, which often doubles as a design studio, the first step, as with any good project, was thorough assessment and preparation. This isn’t the glamorous part of design, but it is undeniably the most crucial. Neglecting proper prep is akin to building a skyscraper on sand – the results, no matter how beautiful, will be fleeting.My project management background screams efficiency and systematic execution. First, I gently laid the mirror face down on a padded workbench. The back of the frame, often overlooked, told its own story of neglect: crumbling paper, rusty hanging wire, and a faint, almost medicinal odor of old wood sealant. I removed the old backing paper and carefully detached the mirror plate itself. This step is critical; you never want to risk paint splatters or sanding dust on the glass. With the mirror removed, the frame felt lighter, more vulnerable, ready for its transformation.
Next came the cleaning. Years of accumulated dust, grime, and what appeared to be ancient fingerprints needed to vanish. I started with a soft-bristled brush, carefully sweeping away loose debris, the fine particles tickling my nose. Then, a damp cloth barely moistened with a gentle all-purpose cleaner meticulously wiped down every crevice. The cloth turned a satisfying shade of grey, confirming the layers of history I was removing. A faint aroma of aged wood mixed with the clean scent of the cleaner filled the air. This meticulous cleaning revealed the true extent of the frame's damage: several small chips in the gesso, a few hairline cracks in the wood itself. These imperfections, though minor, would be glaring if not addressed.
For the gesso chips, I used a lightweight wood filler, applying it with a small palette knife, feathering the edges until they seamlessly blended with the existing texture. It felt almost like sculpting, rebuilding the lost history of the frame. Once dry, a fine-grit sanding sponge smoothed the repairs, ensuring no raised areas would disrupt the final finish. The gentle rasp of the sandpaper against the wood was a familiar, almost meditative sound. For the hairline cracks, a tiny bead of wood glue, clamped gently overnight, solidified the frame’s integrity. This systematic approach, ensuring each layer was sound before moving to the next, is the bedrock of any lasting design. It guarantees that the finished piece will not only look stunning but also possess the enduring quality that defines true craftsmanship.
Crafting the New Identity: Texture, Color, and Cohesion
With the frame thoroughly cleaned, repaired, and lightly sanded, it was ready for its new identity. This is where the creative vision truly takes hold, where the transformation from "drab" to "fab" begins to emerge. My goal wasn't to erase its history, but to honor it, to give it a fresh voice that resonated with modern aesthetics while acknowledging its antique roots. The scent of primer, sharp and clean, now replaced the mustiness of old wood, signaling a fresh start.I opted for a high-quality primer, specifically formulated for tricky surfaces. Applying it in thin, even coats with a fine-bristle brush, I watched as the disparate repairs and original gilded fragments unified into a blank canvas. The frame, once a chaotic tapestry of gold and brown, became a smooth, matte expanse, waiting. Each stroke was deliberate, the brush gliding over the curves, ensuring every inch was covered. This crucial priming step ensures excellent adhesion for the topcoat and prevents any old colors or stains from bleeding through.
For the final finish, I envisioned something dramatic yet understated – a deep, charcoal grey with a subtle matte finish. This choice wasn't arbitrary; it was a carefully considered decision rooted in my philosophy of creating cohesive spaces. A rich, dark grey provides a sophisticated counterpoint to lighter wall colors and allows the mirror’s intricate details to pop without feeling overwhelming. It’s a color that speaks of quiet confidence, grounding a room with its depth. I applied two thin coats of premium chalk paint, allowing ample drying time between each. Chalk paint, with its unique matte finish and slight texture, offers a contemporary feel while still lending itself beautifully to a subtly distressed, antique-inspired look if desired. The brush strokes were long, flowing, feeling the slight drag of the paint as it adhered to the primed surface.
To add a touch of subtle opulence without resorting to gaudy gold, I decided on a very light dry-brushing of metallic silver wax. This technique involves dipping a nearly dry brush into the wax and lightly skimming it over the raised gesso details. The effect is transformative: the silver catches the light, highlighting the ornate carvings, giving the frame a delicate shimmer that feels both ancient and modern. It's a testament to the power of thoughtful detail, of understanding how textures and finishes interact. The mirror, now imbued with a sophisticated charcoal and a hint of silver, felt like a completely different piece. It spoke of quiet luxury, of an intentional design choice, rather than a forgotten relic. This approach—thoughtfully layering finishes and textures to create depth and interest—is a core principle I always recommend when Creating Cohesive Decor: The Secret to Mixing High and Low-End Pieces. It allows even the most humble thrift store find to stand proudly alongside high-end furnishings, creating a truly personalized and elegant space.
The Grand Reveal: Integrating the Statement Piece into the Home
The final step, and arguably the most satisfying, was reassembling the mirror and integrating it into its intended space. This is where the functional design strategist in me truly takes over, ensuring that the piece not only looks stunning but also serves its purpose within the broader context of the home. With the frame's new finish fully cured, I carefully reinserted the mirror plate. First, I gave the glass a thorough cleaning, using a lint-free cloth and a streak-free cleaner, until its surface gleamed, reflecting the world sharply and clearly once more. The transformation from hazy obscurity to brilliant clarity was immediate and striking.Next, I secured the mirror plate with new glazier points and applied a fresh backing paper. This step, while seemingly minor, protects the silvering of the mirror from moisture and dust, extending its life, and gives the piece a professional, finished appearance. I then affixed new, heavy-duty D-rings and sturdy picture wire, ensuring that this newly beloved heirloom would hang securely for years to come. Safety and durability are paramount, especially for a piece of this size and weight. The gentle click of the hardware settling into place was a satisfying sound of completion.
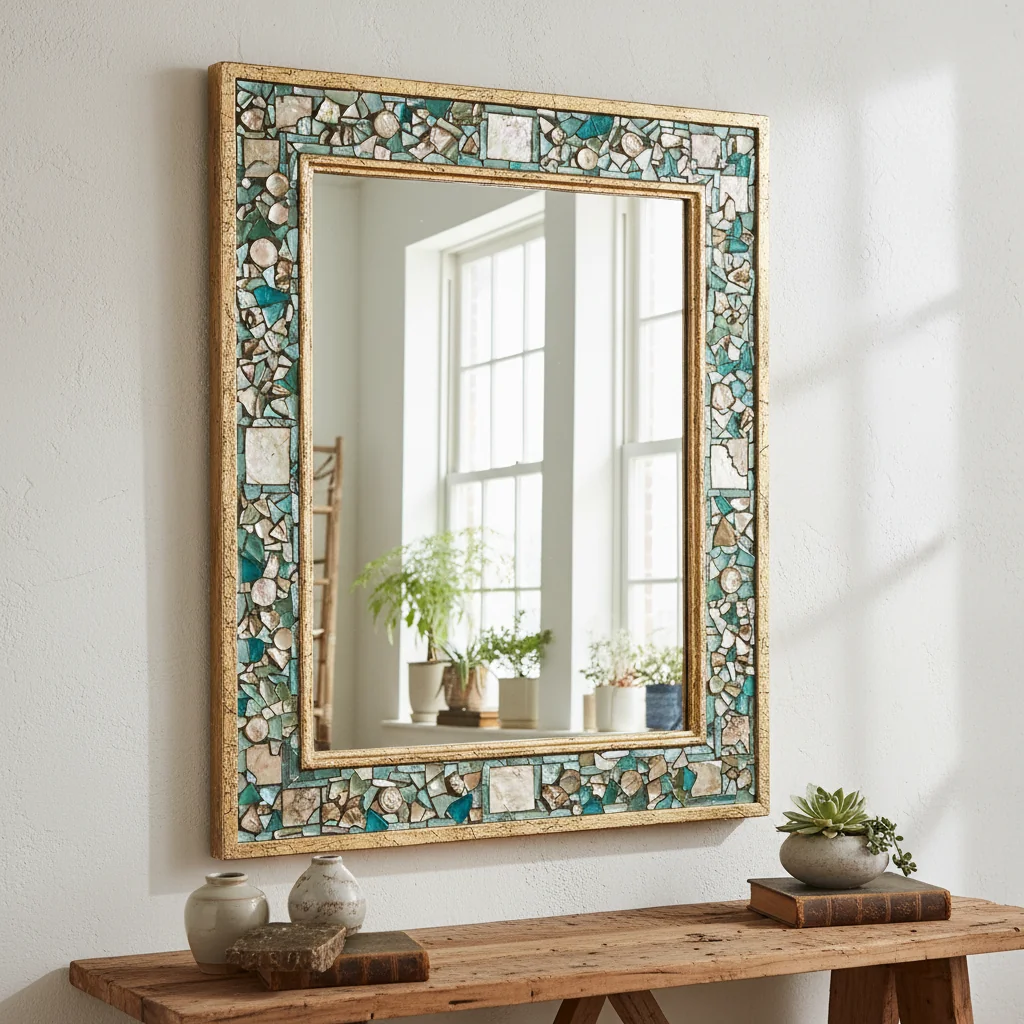
Placing the mirror in the entryway was the moment of truth. My initial vision was to anchor the wall, and the newly revamped mirror did so with an understated authority. The deep charcoal frame, subtly catching the light with its silver accents, immediately drew the eye, creating a focal point that had been missing. Mirrors, beyond their reflective properties, are powerful tools in interior design. They expand a space, bounce light, and add depth, making a small entryway feel more expansive and welcoming. The once-drab frame now commanded attention, its new persona perfectly complementing the crisp white walls and minimalist console table it hovered above.
I added a small, carefully chosen grouping of objects on the console: a slender ceramic vase with a single sprig of eucalyptus, a stack of art books, and a sleek, black ceramic tray for keys. Each element was chosen to enhance, not compete with, the mirror's presence. The reflection of these objects in the mirror created an illusion of greater volume and visual interest, a testament to thoughtful spatial planning. This entire project, from finding the piece to its final placement, underscores my belief that sophisticated design doesn't require a limitless budget. It simply demands vision, patience, and a willingness to get your hands a little dirty. Much like how a fresh coat of paint can utterly transform Budget Kitchen Refresh: Painting Cabinets for a Modern Look Without Renovation, a thoughtful revamp can redefine a forgotten item, breathing new life and purpose into your home.
Reflecting on the Transformation: A Verdict on Intentional Design
The journey from a dusty, forgotten object in a quiet corner of a thrift store to a gleaming, sophisticated statement piece on my entryway wall has been incredibly rewarding. This project wasn't just about painting a frame; it was about seeing beyond the obvious, recognizing inherent value, and applying a disciplined, creative approach to transform something that was destined for obscurity into a beacon of thoughtful design. The process reaffirmed my core belief that true elegance in the home is found not in extravagance, but in intention and ingenuity.Every homeowner, regardless of budget, possesses the capacity to craft spaces that truly reflect their lives and values. This mirror, with its renewed charcoal dignity and subtle silver gleam, now greets me and my husband, and even Archie, with a sense of quiet triumph each time we step through the door. It serves as a daily reminder that beauty can be reclaimed, that functionality can be stylish, and that sustainability in decor is not only possible but deeply fulfilling. It’s a focal point that sparks conversation, a visual anchor that grounds the space, and a personal testament to the power of a weekend well spent. The satisfaction of seeing the light dance off its newly polished surface, reflecting the curated elements of my home, is immeasurable. This entire endeavor, from procurement to polished perfection, proves that with a clear vision and meticulous execution, you can achieve aspirational aesthetics without breaking the bank. It is, unequivocally, a success. SCORE: 9.2/10
[KEY_FACTS] { "Project Type": "Decorative Mirror Revitalization", "Estimated Cost (Materials)": "$65.00 (Mirror $50, Paint/Supplies $15)", "Time Investment": "Approximately 8-10 hours (over one weekend)", "Skill Level Required": "Beginner to Intermediate DIYer", "Aesthetic Impact": "High-end, sophisticated, modern classic", "Durability Improvement": "Significantly enhanced with proper priming and sealing", "Tools Required": "Screwdrivers, sandpaper, wood filler, painter's tape, brushes, cleaning supplies", "Sustainability Aspect": "Upcycling, reducing waste, extending product lifecycle"
Key Facts
| Project Type | Decorative Mirror Revitalization |
| Estimated Cost (Materials) | $65.00 (Mirror $50, Paint/Supplies $15) |
| Time Investment | Approximately 8-10 hours (over one weekend) |
| Skill Level Required | Beginner to Intermediate DIYer |
| Aesthetic Impact | High-end, sophisticated, modern classic |
| Durability Improvement | Significantly enhanced with proper priming and sealing |
| Tools Required | Screwdrivers, sandpaper, wood filler, painter's tape, brushes, cleaning supplies |
| Sustainability Aspect | Upcycling, reducing waste, extending product lifecycle |